08.08.2023
Building a platform with Kubernetes
Kubernetes basics - simply explained
Kubernetes is a complex technology that keeps challenging even the most experienced developers. That’s why numerous providers have developed tools designed to simplify the work with Kubernetes.
In this article, we’ll have a closer look at the technological toolbox available to us. We’ll outline the scope of application for various tools and provide examples of the solutions they offer.
Table of contents
Kubernetes is an open source technology for managing containerized software and helps developers keep individual applications highly available to end users.
The Kubernetes technology can be used by developers completely independently - to manage "just" software. An application can then generally be run independently on the cluster. However, if this application is not only to be executed in the cluster, but is also to be accessible "from outside", e.g. by an end user, a technology such as Ingress is required in addition to Kubernetes. This is already the start of building an entire platform.
Kubernetes can be supplemented with a variety of standalone applications and other technologies to build a platform of any complexity, in which Kubernetes is then a central component. Such platforms can map very individual development processes, depending on how individual teams organize their processes or which business requirements shall be mapped.
In this blog post, we want to present and explain individual technologies and applications that come into question for building such a platform. Our target group here is, on the one hand, developers who do not yet have any experience with Kubernetes, and, on the other hand, people who are active in the field of software development but do not develop themselves but, for example, manage projects.
The list of applications and technologies presented here represents only a selection of the possibilities for individual subareas and is not exhaustive.
1 Managed cluster and Kubernetes distributions
1.1 Managed Kubernetes cluster
What does it do?
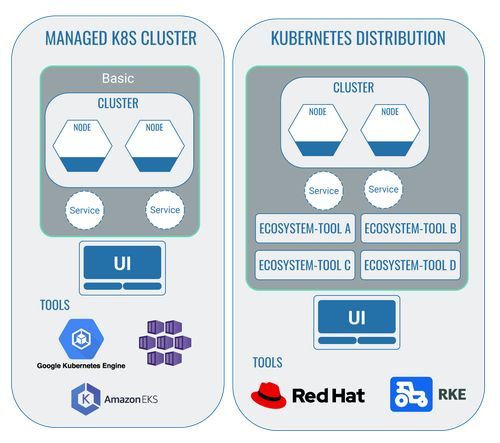
As previously explained in our article about Kubernetes for non-developers, Kubernetes (also shortened to k8s) is an open-source technology that can be freely used by anyone. On top of this, though, there are also providers of so-called managed Kubernetes clusters. These provide both the infrastructure and an initial user interface for the use of Kubernetes.
Who are the providers?
The most well-known providers for managed Kubernetes clusters are Azure Kubernetes Service (AKS), Google Kubernetes Engine (GKE) and Amazon Elastic Kubernetes Service (EKS).
All providers supply the user with a user interface as well as additional services for the work with Kubernetes. Whether individual services are already included in the basic packages or whether they’ll have to be purchased as part of licences very much depends on the respective provider.
In each scenario, the developers should always check which services are supplied by individual providers and whether these are necessary and a worthwhile investment. AKS, for example, already provides good logging in their basic version, while EKS requires you to purchase such a feature in addition to the basic version.
1.2 Kubernetes distributions
What does it do?
The differentiation between providers of managed Kubernetes clusters and those of Kubernetes distributions isn’t exactly easy.
A Kubernetes cluster with the necessary nodes and pods can be operated completely autonomously. To do this, you do not need to use a managed cluster.
However, the tools outlined in the following must not necessarily be used if you operate a Kubernetes cluster. By using these tools, platforms of any desired complexity can be created, with the Kubernetes cluster as their key component. We’ll be describing these as ‘ecosystem tools’.
Providers of Kubernetes distributions provide an already preconfigured platform with individual ecosystem tools. Providers of managed Kubernetes clusters, however, ’only’ offer the infrastructure and a first user interface as part of the Kubernetes usage. This includes a number of functions that can be expanded by any ecosystem tools.
The added value of Kubernetes distributions lies in the fact that developers don’t have to integrate these tools into the cluster themselves. It can generally be expected that the tools used in this platform have compatible configurations with one another and with the Kubernetes cluster. It can also be expected that they automatically receive regular updates and will therefore run without any issues.
Nevertheless, the developers do have the freedom to integrate these platforms into a managed Kubernetes cluster and some providers of managed Kubernetes clusters do in fact offer a Kubernetes distribution.
To sum up, you might say that managed Kubernetes clusters provide a pre-built basic framework for the work with Kubernetes. Kubernetes distributions take it a step further and offer additional tools that are already integrated as a package.
Who are the providers?
The most well-known providers for a Kubernetes distribution are probably Red Hat OpenShift and Rancher Kubernetes Engine (RKE).
Here is an article about managed vs. unmanaged Kubernetes that we wrote a while ago, if you like to take a deeper dive into the topic.
2 Technologies that are installed in a Kubernetes cluster
2.1 Kubernetes Dashboard: The standard front end
What does it do?
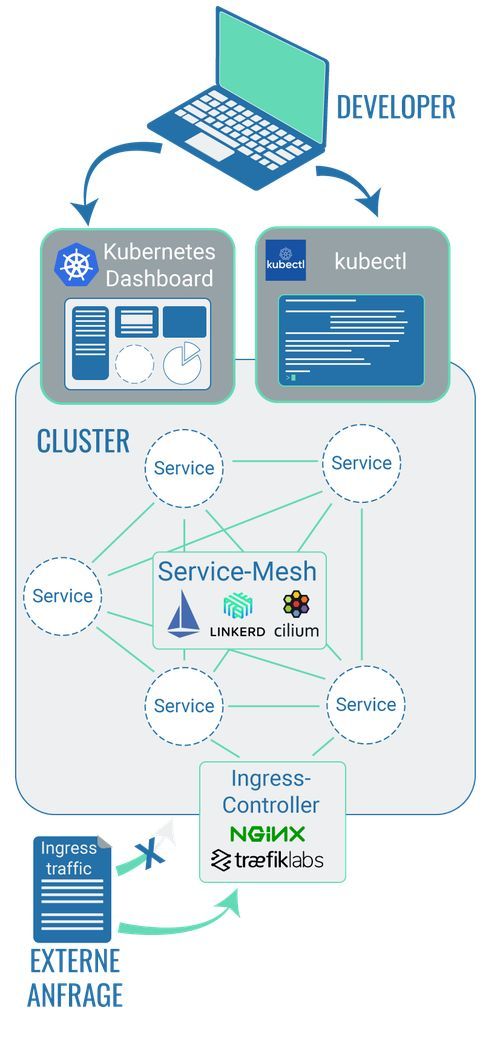
Kubernetes Dashboard is a web-based user interface. As part of Kubernetes, this user interface lets you deploy containerised software on a cluster, for example, or manage its resources. This allows you to have an overview of all applications and services that run in a cluster. It also enables you to modify individual Kubernetes resources like Jobs, deployments etc.
It should be noted, though, that Kubernetes Dashboard isn’t installed as the default user interface in a cluster – you’ll specifically have to select it.
A Kubernetes cluster can also be managed and monitored without Kubernetes Dashboard, via the command line. However, it’s a lot easier to operate the cluster using Dashboard.
What tools are out there?
Kubernetes Dashboard is the standard front end for a Kubernetes cluster. Alternatively, there are other providers of managed clusters, like AKS and GKE, who offer their own dashboards.
2.2 Command line tool: Technologies that allow you to communicate with a cluster
What does it do?
While we should imagine a cluster as an autonomous, self-contained entity, it does still depend on its environment. A cluster only does whatever a command instructs it to do. Effectively, there needs to be a way for developers to communicate with the cluster.
That’s where the user interface comes in: it can display the packaged information to the cluster and allows developers to communicate with the cluster. However, most developers prefer to work with so-called command line tools: information can be retrieved without any major graphic processing or relayed straight to the cluster.
Imagine command line tools like integrated development environments during software development: different tools each have a different range of functions and also focus on various different areas of application. You can find some examples in this article about integrated development environments. And along the same lines, there are also different command line tools that developers can use for their work with a Kubernetes cluster, if they prefer to do so.
What tools are out there?
Examples of available tools are kubectl, kubectx and kube-shell.
Let’s use a car as an analogy: imagine Kubernetes contains the concept of the car door. Developers can use this car door to communicate with a Kubernetes cluster. Command line tools then implement the concept of the door in different ways: one tool opens the door forwards, the second tool opens the door backwards and yet another tool acts as a wing door. It ultimately doesn’t matter which tool is used, though, and the decision is completely up to the developer. Different developers who work with the same cluster can also use different command line tools.
2.3 Service mesh: Technologies that allow you to manage the communication between cluster components
What does it do?
‘Classic’ applications tend to be designed using a monolithic architecture. ‘Modern’ cloud-native application architectures, on the other hand, are all about individual microservices. In this case, the application can only develop via the intertwining and interaction of several microservices. Individual services are packaged in containers which are compiled in individual pods. These pods communicate with one another and exchange information. Check out our blog to find out more about the difference between monoliths and microservices.
The communication between individual pods (which contain the containerised code) takes place within a Kubernetes cluster and is defined by the developers. In addition to this, the developers can also use a so-called service mesh which allows for the communication between the pods to be specified even further.
To demonstrate this, let’s imagine an online shop as an example. At check-out, the customer has two payment options: payment by invoice and by credit card. The shop operators would like to introduce PayPal as an additional payment option. After the developer has written the code required for this and tested it in a test environment, they want to do a first trial in the live shop.
By using a service mesh, the newest development (choice of three payment options) can be made available on its own pod within the cluster. The original set-up (choice of only two payment options) can still remain in the cluster. Using the service mesh, developers can specify that 80% of the incoming requests should continue to be sent to the pod with the original set-up (option of only two payment options). Effectively, only 20% of the requests reach the pod with the newest set-up.
But service mesh can do even more than that: in the example above, service mesh is used to specify what is communicated to the individual pods. However, you can also use service mesh to specify how the communication takes place within the cluster. For example, the communication is generally not encrypted, but thanks to service mesh, an additional encryption can be specified.
What tools are out there?
Examples of tools that provide the service mesh technology are Istio, Linkerd and Cilium.
The tools all offer a different range of possible usages. Linkerd, for example, has so-called ‘sidecar proxies’ which enable the set-up of encrypted communication between the pods inside the cluster. While Istio does not offer this function, it does have some benefits compared with Linkerd: it’s less complex, has a leaner architecture and does not require any code changes in the Kubernetes application itself. Which tool is the best choice will ultimately have to be checked and evaluated by the developers. Check out online articles like this list by DevOpsCube that dive deeper into the individual tools.
2.4 Ingress controller: Technologies that allow you to control the requests to the cluster
What does it do?
‘Ingress traffic’ refers to the data traffic that originates outside of a computer network and is directed at this network. With regard to a cluster, this means that a request from outside a cluster is directed at this cluster, i.e. a user calls up a website or service which is run in a cluster. The technology or resource ‘Ingress’ makes HTTP and HTTPS requests from outside the cluster available for services within the cluster.
Similar to the technical concept of Kubernetes, the technology ‘Ingress’ also is an abstract technical blueprint. What exactly the implementation of this technical blueprint looks like, also depends on the supplier. To use the car analogy again: it’s up to the individual car manufacturer to decide whether the motor should be a combustion engine or an electric engine.
So Ingress itself is the concept of how external requests to a Kubernetes cluster are created. This might include the process of how the number of external requests in the Kubernetes cluster are balanced out, for example. Or it might even just be about making sure that a URL that can be reached externally is allocated to an available application in the cluster. The concept’s implementation is therefore the task of a so-called Ingress controller – i.e. the provider’s respective configuration of Ingress.
But Ingress controllers are not only relevant with respect to the Kubernetes clusters, but also with regard to the usage of all services within a computer network that are to be accessible for external data traffic. And that includes services that are hosted on individual servers.
What tools are out there?
There is a whole range of available Ingress controllers. Some of the most well-known ones that are often used in combination with Kubernetes clusters are Nginx and Traefik.
Both have various benefits and drawbacks, depending on how they’re used.
The decision of which Ingress controller to choose should not be underestimated and needs to be based on a thorough evaluation by specialised developers. This unfortunately exceeds the scope of this article. We can recommend these two articles about Ingress and Ingress controllers from the Kubernetes website, however, to help you continue your research.
3 Technologies that are installed around a Kubernetes cluster
3.1 Technologies that containerise code
Container Images
Kubernetes is a technology for the orchestration of containerised software. Head to our blog article ‘Kubernetes explained for non-developers’ to find out more about this subject. Unless you have containerised software, it’s pretty pointless to use Kubernetes – because ultimately, Kubernetes can only work with containerised software.
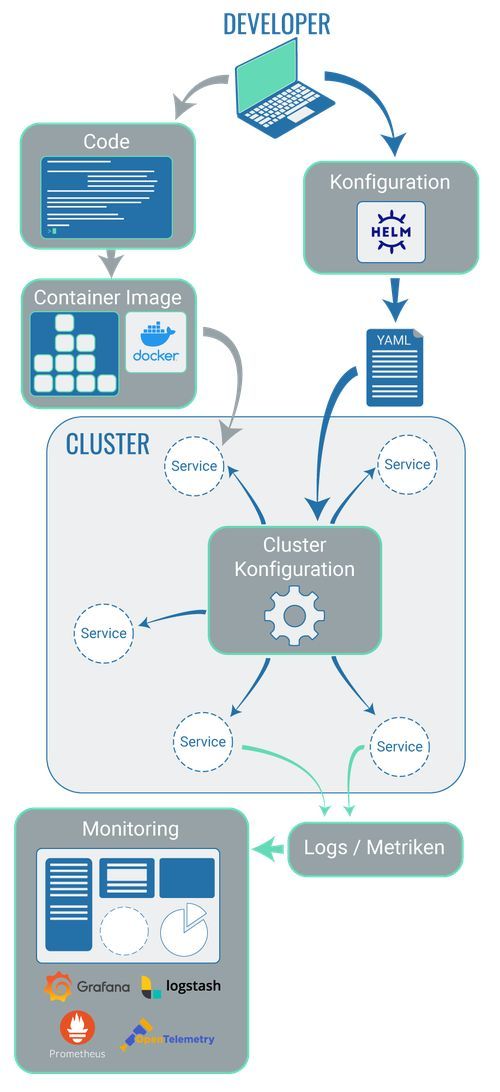
After a code for an application has been written by a developer, a so-called ‘container image’ is created based on this code. In Kubernetes, the respective container image is then referenced later on. These container images are either managed in an autonomous container registry outside of the cluster or directly in the cluster itself. This referenced container image will technically only become an independent container once it’s run in Kubernetes.
A container image is a read-only template of an application’s code, including all necessary information that is relevant for the running of the code. For example, configuration data, environment variables, libraries etc. So you could imagine a container image as an unmodifiable digital image of the code. The benefit of container images is the fact that they can be duplicated and used by several different developers simultaneously. This makes container images the ideal resource as they can be split in a cluster. It allows application code to be run on several pods within a cluster, for example, which also means you can scale it.
Another benefit of using container images is the fact that the image already contains the configuration for the container that will later be created. Unlike the running of software code on your own server, the containers already receive all the required configuration via the information from the images. All containers that are generated based on the images later on are subsequently all configured in the same way. If software code is run on individual servers, the configuration has to be carried out individually for every single server. A time-consuming process that is highly prone to error. You can find more information about this subject in this article about Docker and in this article about Docker images.
Tools for creating container images
The most well-known provider of tools that allow you to create a container image from software code is Docker. Using Docker or similar tools, like rkt by CoreOS or LXC, you can create a container image.
Docker specifically is a visualised operating system for containers and behaves similarly to a virtual machine (VM): a VM visualises server hardware, while containers virtualise a server’s operating system.
Docker is currently the market leader for this service. However, do check out Docker in comparison with other providers along with their pros and cons before making your decision. Which tool is ultimately selected to implement this technology, mostly depends on the technical requirements and the respective developer’s preferences. For example, are they working with Windows, Linux or Mac?
To manage container images, you can use quay.io, for example. Or check out these alternatives to quay.io to compare the different tools – we’d particularly like to point out Harbor. While quay.io is a tool that provides a container registry outside of the cluster, Harbor can be installed directly in the cluster. This means that the management of images is effectively carried out directly in the cluster, too. The benefit? This way, no additional external service outside of the cluster will be necessary anymore. Whatever option is the best choice is still a decision each individual developer team has to make. It’ll depend on the individual requirements of the software that is to be created.
3.2 Technologies that allow you to manage apps and configurations in a cluster
Configuration of a cluster with yaml files
Just because a cluster exists, doesn’t mean that it’s automatically ready for productive operation immediately. Every cluster has a specific configuration and with every new application within a cluster, this configuration has to be taken into account so that everything runs correctly.
A cluster’s configuration is defined in so-called yaml files. Yaml files contain specifications for the deployment.
These can be created manually by the developers. The drawback of this is that a manual creation of files will always be prone to errors. What’s more, a complex cluster also requires several yaml files which all have to follow the same standard. This also means that every developer in a team has to know and use this standard. If the standard is to be changed, this requires prior agreement.
In order to make this process more efficient, stable and effective, there are tools that provide templates which ensure that all yaml files ‘look the same’.
Using Helm for the creation of yaml files
The most well-known tool that is installed outside a cluster in order to create yaml files is Helm.
In so-called Helm charts, a number of things are defined: they specify the dependencies between individual applications within the cluster, which Kubernetes resources are required and whatever else is necessary in order to provide and run container applications.
A Helm chart can be used in the cluster as many times as you need in order to implement any number of application instances and thereby to easily scale the system. You can find more relevant information on the subject in this article about Helm charts.
Helm charts can also be shared with other people. This means they are the central instance for a one-off definition of the application and can subsequently be managed by many different people with minimal effort.
3.3 Technologies that allow developers to run Kubernetes locally
Development on local machines
Let’s do a quick dive into the world of the developers for this one. Usually, individual components of a complex code get developed – separate features that will then be brought together at a later stage. Developers effectively write code on their own computers rather than directly in the complex production or test environments. Only later will the individual components be united.
For this to happen, the project-specific development environment needs to be available on the developers’ own computers, i.e. the framework configuration of the future testing and production environment. This is always required, no matter whether Kubernetes will eventually be used for the software operation or not.
The challenge for the developers will be to configure this environment correctly on their local computer. Only if the development is done against the right configuration, will the code be able to run flawlessly in the production and test environment later on. So far, the biggest challenge has been that every individual developer had to carry out the respective configuration themselves. Naturally, this requires close coordination between the teams that develop the software (development teams) and the teams responsible for the configuration of the servers that are to be used at a future stage (operations team). And let’s be honest – the communication between the two teams wouldn’t always be smooth.
If Kubernetes is used to run the software code, however, there is now a whole range of handy tools around. They enable the operations team to carry out and maintain the cluster’s configuration autonomously. The use of these specialist tools also allows the development teams to install the configurations on their own computers without having to take any configuration measures and without first having to coordinate the approach. Even if the cluster’s configurations change, these tools allow for the changed configurations to be transferred to the developers’ computers without any further communication between the teams.
Tools for local development
Examples of tools that offer this technology are minikube, kind and K3s.
You can find a good overview of the different scope of each tool and their possible application here.
3.4 Technologies that bridge containers
What does "bridge" mean?
Just a little disclaimer: the term ‘bridge’ isn’t necessarily part of the official terminology to describe the tools we’re about to present. To be quite honest: we started using this term internally as it describes the purpose of these technologies pretty well. So if you’re searching the internet for the verb ‘to bridge’ in connection with Kubernetes, you’re unlikely to get many hits. So let us explain the term ‘to bridge’ and the respective tools in a little more detail.
In order to operate a cluster, you need a number of resources, especially processing power. And processing power costs money. Money is naturally a limited resource, and we don’t want to start a philosophical debate about how neither commercial nor non-commercial software development has access to an ever-growing money tree.
Even if a developer makes a cluster available for themselves locally in order to make the software development more effective, this will ultimately require resources and subsequently also money. Just imagine a large team of developers working on a variety of smaller, new features for a major hotel booking platform and every single developer has a locally accessible cluster. This gives you an idea of the scope of resources required to make this happen.
Thankfully, there are customised technologies to deal with this problem. If developers install a tool of this technology on their computers, it is possible for the code to be developed locally and to be packaged in containers. However, when running the code in the container on the developer’s own computer, the container is ‘led to believe’ it’s located in a cluster.
This ‘make believe’ isn’t quite yet what we mean by ‘bridging’. Technically, bridging only begins once developers start working on an existing code – to fix a bug, for example. To do this, the developer can use one of the relevant tools (see below) to ‘clone’ a container onto their local computer and then work on an existing code. The edited code, along with its cluster, can be placed on a container and tested, while still only being run exclusively on the developer’s local system. As long as this bridge exists, all users that have access to the URL can also access this code change.
It should be noted that all traffic on this container will then also take place via the local development environment of the respective developer. So this approach is particularly useful when carrying out work in a staging cluster: this way, bug fixes can be tested directly during staging. For work in a production cluster, however, this approach should not be used.
What tools are available for bridging?
One of the most well-known tools for bridging is ‘Telepresence’.
For this purpose, Blueshoe has also developed their own tool called ‘Gefyra’. While Gefyra isn’t quite as comprehensive as Telepresence in terms of its functionalities, it is considerably more convenient for developers when creating a bridge. The reason: it focuses on the actual usage. If you want to find out more about this, you can find a detailed comparison of Gefyra and Telepresence in our blog.

3.5 Technologies that provide developers with a development environment that matches the production environment
Requirments for development environments
If work needs to be done on software code that is run in a cluster, it’s necessary for the developers in the local development environment to also have a cluster at their disposal.
That’s why it makes sense for the local cluster’s configuration to closely match the cluster on which the software code will later be run. To ensure this, dedicated tools like minikube can be used (see above).
It also makes sense to ‘prefill’ the local development cluster, meaning it’s useful if the existing data in the cluster largely matches the live data. This might include databases, database entries, integrated third systems as well as tools for identity management etc.
So effectively, we have tools that allow for clusters to be created on the local development environment of individual developers. These tools ensure that all developers have the same configuration at their disposal. One example of this is minikube (see above).
Other tools allow the developers to edit existing code in the local development cluster and to then ‘try’ this code in the cluster before deployment. Examples of such tools are ‘Telepresence’ and ‘Gefyra’ (see above).
And then there are tools introduced in the following section which allow you to provision local clusters with data and/or third-party systems that are as close to the live system as possible.
What tools are out there?
Here’s another Blueshoe original: we have developed a tool called ‘Getdeck’ which enables the fast and simple provision of virtual Kubernetes clusters to developers. With Getdeck's Shelf feature you can prepare fully configured virtual clusters that have all configurations of your production system available and can simply be picked of the shelf and used by developer. Want to find out more? Then head to the Getdeck website. We strongly believe in our tool and use it in our work on a daily basis. Feel free to book an appointment with us and we will be more than happy to tell you more about Getdeck.
3.6 Technologies that ensure the quality of the code
Advantages of CI/CD
Back in the day when software was only made available via floppy disks or CD-ROMS, a developer’s focus used to be on the development of a permanent software version. When an update came around, the user had to go and get a new CD-ROM with the updated code status.
Today, this approach has thankfully been overhauled: software gets developed further all the time and new updates are released on the regular.
This also means that nowadays, individual programme components are regularly merged – so their compatibility has to constantly be checked, too.
If this process is structured in a linear fashion and the compatibility of individual software components only get checked right at the end, significant problems can arise. For the developers, this can mean pure ‘integration hell’: while a code for a new or updated feature may be completed, it might not interact as desired with other code components due to unforeseen dependencies. The result: nothing works as planned.
A solution for this issue is the CI/CD method. The acronyms stand for:
CI - Continuous integration
Automation process for developers
Individual developers’ code changes are regularly merged, which is particularly beneficial since it allows for a significantly earlier detection of incompatibilities. More on the subject can be found in this article about CIs and CDs.
CD - Continuous Devlivery
Code changes are tested automatically
CD Continuous Deployment
Approval process of code changes when made available to the end users, i.e. the deployment
Code changes are subject to automated tests and are made available in repositories like GitHub. This also serves as a check to see how the new code interacts with the existing code in the live system.
There are now special tools that make the CD process available specifically to software that is to be run in a Kubernetes cluster. So these are testing tools that are explicitly designed for a Kubernetes environment.
The Argo CD tool
At Blueshoe, we use the tool Argo CD. Argo CD is a Kubernetes controller that monitors a running application at all times. It constantly compares the live status of a code with a certain desired status, as specified in a Git depository (the new software code can be included here, too). Argo CD can then automatically rectify any deviations or visualise the deviations for the developers so that they can quickly be rectified manually. If you want to find out more about this subject, head over to the Argo CD website.
3.7 Technologies for the secret management
Keeping data safe and encrypted?
Even small projects require certain data that have to remain secret and should only be accessible to those people or apps that genuinely require this data. Such data might include passwords for the authorisation of other services (database, API etc.) or the keys for the encryption of stored data. Since these should not end up in the wrong hands, they must not be written in the versioned Kubernetes resources (Kustomize manifests, Helm charts etc.) without encryption (plaintext).
What tools are out there?
The Secrets plugin for Helm encrypts values in the Helm yaml data locally thanks to a key (Mozilla SOPS, for example) that doesn’t live in the repository and is made available to the operator by other means. Only the encrypted secrets are then versioned. When using the charts, the plugin decrypts these values and thereby delivers the secret data to the cluster.
Bitnami Sealed Secrets acts in a similar way but encrypts the secret data within the cluster and generates its own objects, the type being SealedSecrets. These can be versioned and, when the resources are being used, they can be decrypted by an operator and turned into ‘real’ Kubernetes secrets.
Examples of other tools or technologies that can be used solo or in combination with the previously mentioned tools are HashiCorp Vault,Azure Key Vault and AWS Secrets Manager.
3.8 Technologies for monitoring, logging and metrics collection
In a system with many different elements, you need to stay on top of things. To ensure this, it makes sense to gather all logs and other data that provide information about each individual component’s status in one central place and to structure this data in a clear manner. Examples of tools that are used in this context are Prometheus, Open Telemetry, Grafana and Logstash.
4 Cloud-native development
Cloud-native development describes a software development approach that focuses on designing applications that are ready to be used in the cloud right from the start (Gitlab). It therefore makes sense for the actual development to take place in the future cloud environment as much as possible.
With our in-house Blueshoe tech stack consisting of Gefyra and Getdeck, we have made a signification contribution to making this process more efficient and effective for entire development teams.
With that being said, we cannot ignore that there are competitors to our own products that are definitely worth mentioning, such as Okteto and Skaffold.
And still, we think our products are the real deal. They offer exactly what development teams require, have been thoroughly tested and keep getting integrated into other tools: Gefyra, for example, has now become its own Docker Desktop extension.
Sparked your curiosity about our products? Keen to find out more? Go on then, give us a shout – we can’t wait to tell you more!


